Beiträge getaggt mit Brief Introduction
Brief introduction to ASM mirroring
Automatic Storage Management (ASM) is becoming the standard for good reasons. Still, the way it mirrors remains a mystery for many customers I encounter, so I decided to cover it briefly here.
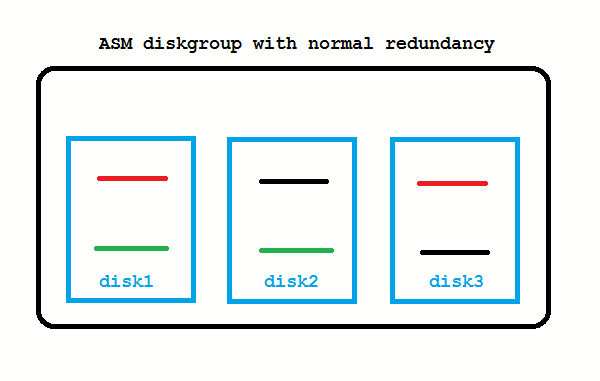
ASM Basics: What does normal redundancy mean at all?

It means that every stripe is mirrored once. There is a primary on one disk and a mirror on another disk. All stripes are spread across all disks. High redundancy would mean that every primary stripe has two mirrors, each on another disk. Obviously, the mirroring reduces the usable capacity: It’s one half of the raw capacity for normal redundancy and one third for high redundancy. The normal redundancy as on the picture safeguards against the loss of any one disk.
ASM Basics: Spare capacity

When disks are lost, ASM tries to re-establish redundancy again. Instead of using spare disks, it uses spare capacity. If enough free space in the diskgroup is left (worth the capacity of one disk) that works as on the picture above.
ASM 11g New Feature: DISK_REPAIR_TIME
What if the disk from the picture above is only temporarily offline and comes back online after a short while? These transient failures have been an issue in 10g, because the disk got immediately dropped, followed by a rebalancing to re-establish redundancy. Afterwards an administrator needed to add the disk back to the diskgroup which causes again a rebalancing. To address these transient failures, Fast Mirror Resync was introduced:
No administrator action required if the disk comes back before DISK_REPAIR_TIME (default is 3.6 hours) is over. If you don’t like that, setting DISK_REPAIR_TIME=0 brings back the 10g behavior.
ASM 12c New Feature: FAILGROUP_REPAIR_TIME
If you do not specify failure groups explicitly, each ASM disk is its own failgroup. Failgroups are the entities across which mirroring is done. In other words: A mirror must always be in another failgroup. So if you create proper failgroups, ASM can mirror according to your storage layout. Say your storage consists of four disk arrays (each with two disks) like on the picture below:

That is not yet the new thing, failgroups have been possible in 10g already. New is that you can now use the Fast Mirror Resync feature also on the failgroup layer with the 12c diskgroup attribute FAILGROUP_REPAIR_TIME. It defaults to 24 hours.
So if maintenance needs to be done with the disk array from the example, this can take up to 24 hours before the failgroup gets dropped.
I hope you found the explanation helpful, many more details are here 🙂
Brief Introduction into Partitioning in #Oracle
Partitioning is a great way to deal with large tables. This post will give you a quick start with examples that you can reproduce easily for yourself. Focus will be on Range-Partitioning, which is still the most popular kind.
First things first: You should only consider to implement partitioning for really large (GB range or more) objects, because it is an extra charged option and the benefits do not show significantly with small objects.
The two major reasons why you may want to use partitioning are Performance and Manageability. Let’s look at this picture:
 Above table is partitioned by the quarter. You will see that the table name and the columns are known by the application layer (INSERT and SELECT statements come from there), while the partitioned nature of the table needs to be known by the DBA only. I’m going to implement this on my demo system:
SQL> grant dba to adam identified by adam;
Grant succeeded.
SQL> connect adam/adam
 Connected.
 SQL> create table sales (id number, name varchar2(20),
 amount_sold number, shop varchar2(20), time_id date)
 partition by range (time_id)
 (
 partition q1 values less than (to_date('01.04.2012','dd.mm.yyyy')),
 partition q2 values less than (to_date('01.07.2012','dd.mm.yyyy')),
 partition q3 values less than (to_date('01.10.2012','dd.mm.yyyy')),
 partition q4 values less than (to_date('01.01.2013','dd.mm.yyyy'))
 );
Table created.
From the viewpoint of the application, this is transparent, but the value of the TIME_ID column determines into which partition the inserted rows will go. And also, if subsequent SELECT statements have the partition key in the WHERE clause, the optimizer knows which partitions need not to be scanned. This is called Partition Pruning:
 I’ll show the application perspective first:
SQL> insert into sales values ( 1, 'John Doe', 5000, 'London', date'2012-02-16' );
1 row created.
SQL> commit;
Commit complete.
SQL> select sum(amount_sold)
 from sales
 where time_id between
 date'2012-01-01' and date'2012-03-31';
SUM(AMOUNT_SOLD)
 ----------------
 5000
SQL> set lines 300
SQL> select plan_table_output from table(dbms_xplan.display_cursor);

PLAN_TABLE_OUTPUT
------------------------------------------------------------------------------------------------
SQL_ID	crtwzf8j963h7, child number 0
-------------------------------------
select sum(amount_sold) from sales where time_id between
date'2012-01-01' and date'2012-03-31'

Plan hash value: 642363238

-------------------------------------------------------------------------------------------------
| Id  | Operation		| Name	| Rows	| Bytes | Cost (%CPU)| Time	| Pstart| Pstop |
-------------------------------------------------------------------------------------------------
|   0 | SELECT STATEMENT	|	|	|	|    14 (100)|		|	|	|
|   1 |  SORT AGGREGATE 	|	|     1 |    22 |	     |		|	|	|
|   2 |   PARTITION RANGE SINGLE|	|     1 |    22 |    14   (0)| 00:00:01 |     1 |     1 |
|*  3 |    TABLE ACCESS FULL	| SALES |     1 |    22 |    14   (0)| 00:00:01 |     1 |     1 |
-------------------------------------------------------------------------------------------------

Predicate Information (identified by operation id):
---------------------------------------------------

   3 - filter(("TIME_ID">=TO_DATE(' 2012-01-01 00:00:00', 'syyyy-mm-dd hh24:mi:ss') AND
	      "TIME_ID"<=TO_DATE(' 2012-03-31 00:00:00', 'syyyy-mm-dd hh24:mi:ss')))
Notice the PSTART=1 and PSTOP=1 above, which indicates Partition Pruning. So only one quarter was scanned through, speeding up my Full Table Scan accordingly. When the table is partitioned by the day, that SELECT on a large, even filled table would run 365 times faster – which is not at all unusual, many customers have hundreds, even thousands of partitions exactly therefore.
Now to the Maintenance benefit: DBAs can now get rid of old data very fast with DROP PARTITION commands. DELETE would be an awful lot slower here – if millions of rows are deleted, that is. Or some kind of Information Life-cycle Management can be implemented like compressing old partitions. They can even be moved into other tablespaces that have their datafiles on cheaper storage:
SQL> alter table sales move partition q1 compress;
Table altered.
When you put indexes on a partitioned table, you have the choice between GLOBAL and LOCAL like on the next picture:
 The LOCAL index partitions follow the table partitions: They have the same partition key & type, get created automatically when new table partitions are added and get dropped automatically when table partitions are dropped. Beware: LOCAL indexes are usually not appropriate for OLTP access on the table, because one server process may have to scan through many index partitions then. This is the cause of most of the scary performance horror stories you may have heard about partitioning!
A GLOBAL index spans all partitions. It has a good SELECT performance usually, but is more sensitive against partition maintenance than LOCAL indexes. The GLOBAL index needs to be rebuilt more often, in other words. Let’s implement them:
SQL> create index sales_id on sales (id);
Index created.
SQL> create index sales_name on sales (name) local;
Index created.
We have Dictionary Views for everything, of course 🙂
SQL> select table_name, tablespace_name from user_tables;

TABLE_NAME		       TABLESPACE_NAME
------------------------------ ------------------------------
SALES

SQL> select table_name, partitioning_type, partition_count from user_part_tables;

TABLE_NAME		       PARTITION PARTITION_COUNT
------------------------------ --------- ---------------
SALES			       RANGE		       4

SQL> select table_name, partition_name, tablespace_name, pct_free, compression from user_tab_partitions;

TABLE_NAME		       PARTITION_NAME		      TABLESPACE_NAME		       PCT_FREE COMPRESS
------------------------------ ------------------------------ ------------------------------ ---------- --------
SALES			       Q1			      USERS				      0 ENABLED
SALES			       Q4			      USERS				     10 DISABLED
SALES			       Q3			      USERS				     10 DISABLED
SALES			       Q2			      USERS				     10 DISABLED

SQL> select index_name, tablespace_name, status from user_indexes;

INDEX_NAME		       TABLESPACE_NAME		      STATUS
------------------------------ ------------------------------ --------
SALES_ID		       USERS			      VALID
SALES_NAME						      N/A

SQL> select index_name, partitioning_type, partition_count from user_part_indexes;

INDEX_NAME		       PARTITION PARTITION_COUNT
------------------------------ --------- ---------------
SALES_NAME		       RANGE		       4

SQL> select index_name, partition_name, tablespace_name,status from user_ind_partitions;

INDEX_NAME		       PARTITION_NAME		      TABLESPACE_NAME		     STATUS
------------------------------ ------------------------------ ------------------------------ --------
SALES_NAME		       Q1			      USERS			     USABLE
SALES_NAME		       Q4			      USERS			     USABLE
SALES_NAME		       Q3			      USERS			     USABLE
SALES_NAME		       Q2			      USERS			     USABLE
This should be enough to get you started. We have much more to say about partitioning, of course: VLDB and Partitioning Guide. The pictures in this posting are from an LVC demonstration that I have done recently to convince potential customers to use this new training format, and I thought to myself: There must be something additional that I can do with this stuff 🙂
I hope you find it useful – feel free to comment, also if you’d like to share some of your experiences with partitioning that would be very much appreciated. Thank you!
Conclusion: Partitioning can be a very powerful tool in the DBA’s arsenal to transparently speed up applications and to ease maintenance. It is no silver bullet, though, so as always: Don’t believe it, test it 🙂
Related postings about Partitioning:
Partition Pruning & Interval Partitioning… shows Partitioning Pruning performance benefit with a larger table and how new range partitions are created automatically
Reducing Buffer Busy Waits with Automatic Segment Space Management & Hash Partitioning… shows why Hash Partitioning is often used for large OLTP tables to reduce contention
Partitioning a table online with DBMS_REDEFINITION… shows how to change the structure of a table while it is permanently accessed by end users
CELL_PARTITION_LARGE_EXTENTS now obsolete… shows that you get 8 MB initial extents for partitioned tables in recent versions
Partition-Pruning: Do & Don’t… shows how the SQL code determines whether Partition Pruning can be used or not
Brief introduction into External Tables
As an Oracle DBA, you will sooner or later encounter the task to deal with interface files (Flat Files) from some other application that you need to process in your Oracle Database. External Tables, introduced in 9i already, are usually the tool of choice for that and can be considered as the successor of the ancient SQL*Loader for that purpose.
An External Table is Metainformation that is stored in the Data Dictionary together with a pointer on the concrete Flat File, placed on the Database Server. We can access this External Table with the same SELECT statements as we would use against ordinary Tables. I have prepared a demonstration with the Flat File ulcase2.dat in the directory /home/oracle/interface on my server:
-bash-3.00$ pwd
/home/oracle/interface
-bash-3.00$ ls -al
total 16
drwxr-xr-x   2 oracle oinstall 4096 Oct 28 14:34 .
drwxrwxrwx  30 oracle oinstall 4096 Oct 28 14:11 ..
-rw-r--r--   1 oracle oinstall  372 Oct 28 14:11 ulcase2.dat
-bash-3.00$ cat ulcase2.dat
7782 CLARK      MANAGER   7839  2572.50          10
7839 KING       PRESIDENT       5500.00          10
7934 MILLER     CLERK     7782   920.00          10
7566 JONES      MANAGER   7839  3123.75          20
7499 ALLEN      SALESMAN  7698  1600.00   300.00 30
7654 MARTIN     SALESMAN  7698  1312.50  1400.00 30
7658 CHAN       ANALYST   7566  3450.00          20
This is just an ordinary ASCII file that we want to access from our Oracle Database:
SQL> grant dba to adam identified by adam;

Grant succeeded.

SQL> connect adam/adam
Connected.
That’s my demo user. Granting the role dba makes the demo easier – no need to grant create/read/write directory privileges especially. Next step is to create a directory as a Database Object, pointing to the OS directory:
SQL> create directory interface_dir as '/home/oracle/interface';

Directory created.
The same directories are needed when we use Data Pump to put Database Objects into binary files. Now here comes the External Table:
SQL> create table interface_table
(
 empno number(4),
 ename varchar2(10),
 job varchar2(9),
 mgr number(4),
 sal number(7,2),
 comm number(7,2),
 deptno number(2)
)
organization external
(
 type oracle_loader
 default directory interface_dir
 access parameters
 (
 records delimited by newline characterset we8iso8859p1
 badfile 'INTERFACE_DIR':'interface.bad'
 logfile 'interface.log_xt'
 fields ldrtrim
 (
 empno (1:4) integer external(4),
 ename (6:15) char(10),
 job (17:25) char(9),
 mgr (27:30) integer external(4),
 sal (32:39) integer external(8),
 comm (41:48) integer external(8),
 deptno (50:51) integer external(2)
 )
 )
 location
 (
 'ulcase2.dat'
 )
)
reject limit unlimited;
Table created.
This is no ordinary table made up by extents and blocks but merely a description of the Flat File:
SQL> select * from user_segments;

no rows selected

SQL> select table_name,tablespace_name from user_tables;

TABLE_NAME                     TABLESPACE_NAME
------------------------------ ------------------------------
INTERFACE_TABLE
Apart from that, we can access it with SELECT like an ordinary table:
SQL> select * from interface_table;

 EMPNO ENAME      JOB              MGR        SAL       COMM     DEPTNO
---------- ---------- --------- ---------- ---------- ---------- ----------
 7782 CLARK      MANAGER         7839     2572.5                    10
 7839 KING       PRESIDENT                  5500                    10
 7934 MILLER     CLERK           7782        920                    10
 7566 JONES      MANAGER         7839    3123.75                    20
 7499 ALLEN      SALESMAN        7698       1600        300         30
 7654 MARTIN     SALESMAN        7698     1312.5       1400         30
 7658 CHAN       ANALYST         7566       3450                    20

8 rows selected.
We can put functions into the query, can add where condition to filter the result set, can choose only some columns etc. That is why External Tables are much more flexible to use as the old SQL*Loader was.
But never the less, SQL*Loader is still useful today to teach us how to create External Tables 🙂 If you look into the Online Documentation of the 9i version, you can still find the SQL*Loader case studies there – that vanished in 10g and above. You see the most common cases of interface files there together with a SQL*Loader controlfile to load them.
If you call the SQL*Loader then with the parameter external_table=generate_only, it gives you the create statement for an External Table – a thing that is not so easy to derive from the External Table Online Documenation, unfortunately.
Another nice usage of External Tables is, that we can access the Alert Log file with them from inside the Database without having to logon to the Database Server:
SQL> show parameter background_dump_dest

NAME                                 TYPE        VALUE
------------------------------------ ----------- --------------------------------
background_dump_dest                 string      /u01/app/oracle/admin/orcl/bdump

SQL> create or replace directory bdump as '/u01/app/oracle/admin/orcl/bdump';

Directory created.

SQL> create table alert_log
 (line1 varchar2(4000))
 organization external
 (type oracle_loader
 default directory bdump
 access parameters
 (records delimited by newline fields missing field values are null)
 location ('alert_orcl.log')
 )
/

Table created.
Conlusion: If you need to process Interface Files in your Oracle Database, take a closer look at External Tables for that purpose – the SQL*Loader is a little old fashioned compared to them
Pickleball spielen auf YouTube


