Adding a cluster node will not only increase the available storage capacity but also the total compute power of your cluster. This scale-out is a quite common operation for Exasol customers to do.
My example shows how to change an existing 2+1 cluster into a 3+0 cluster. Before you can enlarge the database with an active node, this node has to be a reserve node first. See here how to add a reserve to a 2+0 cluster. Of course you can add another reserve node to change from 3+0 to 3+1 afterwards. See here if you wonder why you may want to have a reserve node at all.
Initial state – reserve node is present
I start with a 2+1 cluster – 2 active nodes and 1 reserve node:

For later comparison, let’s look at the distribution of rows of one of my tables:

The rows are roughly even distributed across the two active nodes.
Before you continue, it would be a good idea to take a backup on a remote archive volume now – just in case.
Shutdown database before volume modification
A data volume used used by a database cannot be modified while that database is up, so shut it down first:

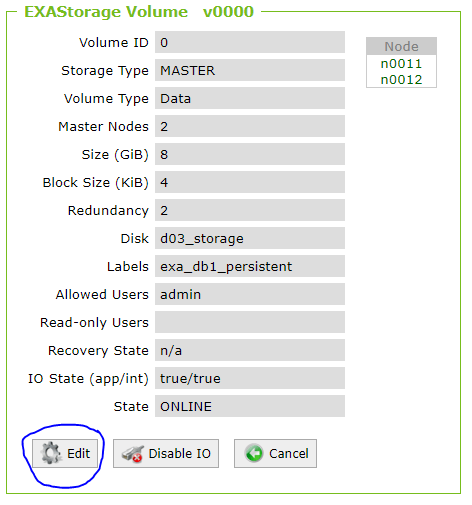
After going to the Storage branch in EXAoperation, click on the data volume:

Then click on Edit:
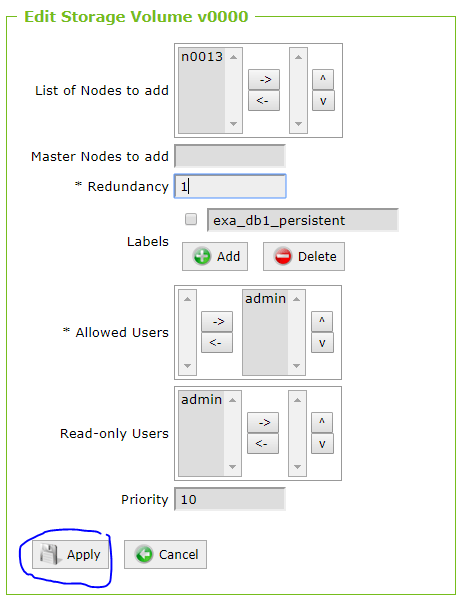
Decrease volume redundancy to 1
Change the redundany from 2 to 1, then click Apply:
Why is the redundancy reduced from 2 to 1 here? Let’s try to explain that. Initially, I had 2 active nodes with a volume using redundancy 2:

A and B are master segments while A‘ and B‘ are mirrored segments. If I could add a node to this volume keeping the existing segments, it would look like this:

Of course this would be a bad idea. The redundancy is reduced to 1 before the new node is added to the volume:

Only distributed master segments with no mirrors at first. Then the redundancy is again increased to 2:

This way, every master segment can be mirrored on a neighbor node. That’s why the redundancy needs to be reduced to 1.
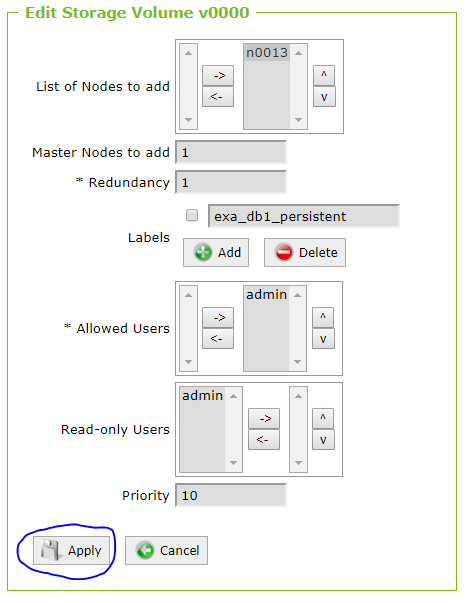
Add new node to volume
After having decreased the volume redundancy to 1, click Edit on the volume detail page again and add n13 as a new master node to the volume and click Apply:
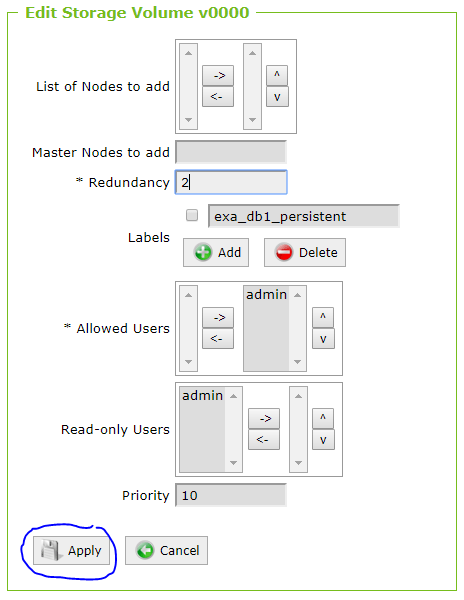
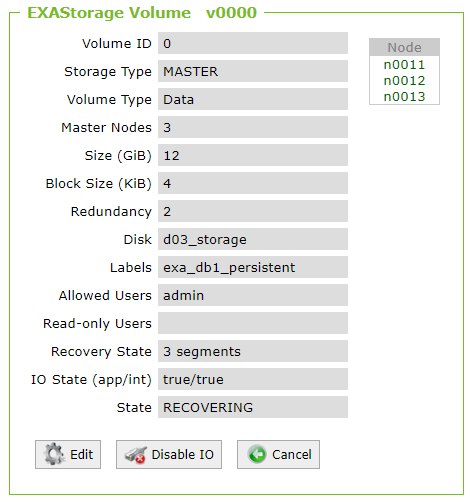
Increase redundancy to 2
Now click Edit again and increase the redudancy to 2:
The state of the volume shows now as RECOVERING – don’t worry, it just means that mirrored segments are now created.
Enlarge the database
Now click on the database link on the EXASolution screen:

Select the Action Enlarge and click Submit:

Enter 1 and click Apply:

The database detail page looks like this now:

Reorganize
Technically, this is a 3+0 cluster now – but the third node doesn’t contain any data yet. If we look at the same table as before, we see that no rows are on the new node:
To change that, a REORGANIZE needs to be done. Either on the database layer, on schema layer or on table layer. Most easy to perform is REORGANIZE DATABASE:

Took me about 10 Minutes on my tiny database. That command re-distributes every table across all cluster nodes and can be time consuming with high data volume. While a table is reorganized, that table is locked against DML. You can monitor the ongoing reorganization by selecting from EXA_DBA_PROFILE_RUNNING in another session.
Final state
Let’s check the distribution of the previous table again:

As you can see above, now there are rows on the added node. Also EXAoperation confirms that the new node is not empty any more:

On a larger database, you would see that the volume usage of the nodes is less than before per node and every node is holding roughly the same amount of data. For failsafety, you could add another reserve node now.
Summary of steps
- Add a reserve node (if not yet existing)
- Take a backup on a remote archive volume
- Shutdown database
- Decrease volume redundancy to 1
- Add former reserve node as new master node to the volume
- Increase redundancy to 2
- Enlarge database by 1 active node
- Reorganize
- Add another reserve node (optionally)

