After having installed Hyper-V, an ISO file with the Exasol software needs to be downloaded. The 2+0 cluster consisting of two data nodes and one license server needs a host machine with at least 8 GB memory and 60 GB free disk space. I do it on my Windows 10 notebook with 16 GB memory. This is for educational purposes of course and not suitable for production use.
2+0 means two active nodes and no reserve node. A reserve node can be added later, expanding the environment to a 2+1 cluster.
We’ll start adding two virtual switches to be able to connect the network adapter of the VMs to them later.
Create Hyper-V Switches for Private and Public Network of the cluster
Click the Virtual Switch Manager in Hyper-V Manager:

Select Private and click Create Virtual Switch:

Name the Private switch edu-cluster-interconnect:

Create another Virtual Switch of type Internal and name it edu-public-network:

Go to Network and Sharing Center and click on the edu-public-network there, then on Properties:

Then select TCP/IPv4 and click again Properties:

Select Use the following IP address and type in 192.168.43.1 and the Subnet mask 255.255.255.0

The IP above can be different as long as it doesn’t conflict with other IPs used in your virtual environment. I find it convenient to let it end with the digit 1, though.
Create the License Server
In Hyper-V Manager, click New then Virtual Machine:

Do not use Quick Create.
Give it the name ls and click Next:

It must be Generation 1:

Give it 1500 MB memory if your host has >= 16 GB memory, else give it 1100 MB. De-select Use Dynamic Memory:

Do not yet connect it to a network:

Give it a disk of 100 GB maximum size:

Select Install operating system later:

After creating ls, click on Settings:

Add a Legacy Network Adapter:

We need Legacy Adapters in the VMs because later, the data nodes need to boot from network and that requires Legacy Adapters to be used. Connect it to the Virtual Switch edu-cluster-interconnect and click Apply.
Connect a normal (not legacy) Network Adapter to the switch edu-public-network:

Confirm the boot order is CD first for ls:

Now power on the virtual machine just created and configured. It should come up with this screen and you type in install

There’s no need for device encryption on an educational system. Tab to OK and press return:

Confirm the LS number as 10. Tab to OK and press return:

Confirm to install EXAClusterOS on first boot. Tab to OK and press return:

Enter exasol12 as the password for the maintenance user:

Check with ipconfig (using the cmd shell) for the Ethernet adapter vEthernet (edu-public-network): Then replace the last digit 1 with 10 for the IP of the public interface. It should be 192.168.43.10

Check the network configuration comparing it to the tab Networking in Hyper-V Manager
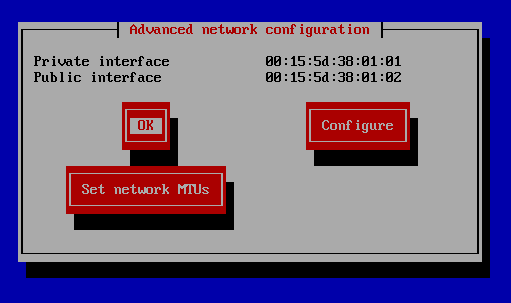
Private must match edu-cluster-interconect and Public must match edu-public-network

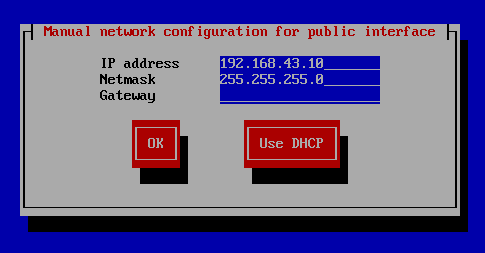
Click on Configure in the Advanced Network configuration to change it accordingly otherwise:
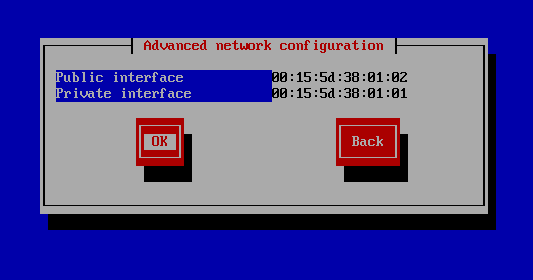
Confirm the (corrected) network configuration. Tab to OK and press return:

This triggers the installation of various components on the License Server and takes some time, depending on the hardware resources of your machine. The critical resource is CPU, so try to avoid running anything else on your machine that consumes CPU during the install.
If the License Server reboots during that process and presents the choice to install, update or boot from local disk, type in local. You may then remove the virtual CD from the CD drive of the VM.
When prompted for login on the node n0010, you may login as the OS user maintenance with the password exasol12 :

Refresh until it shows EXAoperation status: Online
This may take several Minutes depending on your hardware.
Connect to EXAoperation
Now open a Chrome browser (preferred) with the https URL of your License Server’s IP:

User Name is admin, Password is admin
Check Network Configuration
The network configuration should look like this:

Click on Edit and modify it to the above settings otherwise. You may change the Cluster Name to something else. Notice that the value None is not allowed for NTP Servers and you have to remove it. Then click Apply.
Add Monitoring Service
To be able to follow the node’s installation, it’s useful to add a monitoring service now. Click on Services at the left and then on the Add button:
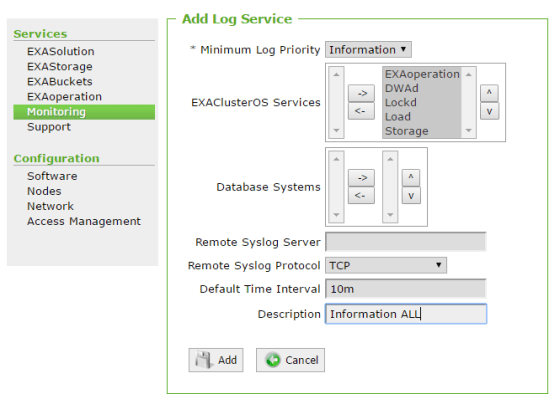
Select all cluster services with the Log Priority Information to get the most verbose output, then click Add.
Add first data node
In Hyper-V Manager, create another VM with the name n11:

Specify Generation 1 on next page.
Give it 2500 MB memory if your host has >=16 GB and 2200 MB otherwise and de-select dynamic memory:

Give it a 100 GB max. sized disk and name it n11sda:

Select install OS later and finish the creation dialog. Then click on settings. Add a legacy network adapter to n11 and connect it to the switch edu-cluster-interconnect:

Connect another normal network adapter to the switch edu-public-network.
Configure the boot order for n11 with legacy network adapter first:

Add a second hard drive to n11:

Select New Virtual Harddisk of type VHDX, dynamically expanding up to 100 GB max. and name it n11sdb:

We need to know the MAC addresses of the data nodes upfront to enter them in EXAoperation, so the data nodes can connect to the license server to get booted over network. The MAC addresses below can be different as long as you know they do not conflict with other machines in your virtual environment,
Select Advanced Features of the legacy network adapter and configure it with a static MAC address of 08:00:27:A9:D1:22

Select Advanced Features of the normal network adapter and configure a static MAC address of 08:00:27:92:10:6B

Do not yet power on the new VM. Instead, click on Add in the EXAoperation Nodes screen:

Configure the added node:

Click on Add, then click on the new node to configure it further:

Scroll down on the node’s detail page and click on Disks:

Click on Edit on the EXACluster Disk Information for node n0011 screen:

Add the device /dev/sda with the other values like on the picture:

Do this accordingly for the other three storage partitions. Make sure to reduce the size to 30 GB for the Data partition and assign /dev/sdb for the Storage partition. It should look like this in the end:

Now power on the n11 VM. It should come up booting from network and start installing. Check that the install starts normally without errors:

If you see errors in the log at this point, turn off the VM and check the configuration as above described, especially the disk layout. After having corrected it, power the VM on again. Make sure the state of the node shows as Unknown to install (Not Unknown Active) here. Execute the action Set install flag for the node to change it to the state Unknown to install otherwise.
While the install of n11 is ongoing, add the second data node as a Hyper-V VM just like the n11 VM before. Give it the name n12 with all the same properties as n11, except these MAC addresses:
Legacy network adapter (Private Network) 08:00:27:AA:61:8D
Normal network adapter (Public Network) 08:00:27:A3:AB:46
After having created n12 in Hyper-V, go to EXAoperation and click on the n11 node:

Scroll down on the node’s detail page and click on Copy Node.
Change the node numbers to 12 and the MAC addresses as above listed:
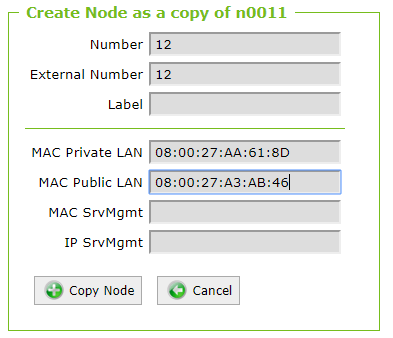
Click on Copy Node again to finish the creation of n12.
Click on the Nodes screen:

The install of n11 is still ongoing and n12 is now ready to start in Hyper-V. Power it on.
It should come up and install like n11. The install ends with the nodes prompting for login and a message like Boot process finished after xxx seconds in the logservice.
The install consumes much CPU resources. Try to avoid running anything else on the machine while it is ongoing. It may take quite a long while to complete, depending on your local machine power.
It looks like this in the end:

Now select the two nodes and execute the action Set active flag for them:

Their state should now change to Running Active.
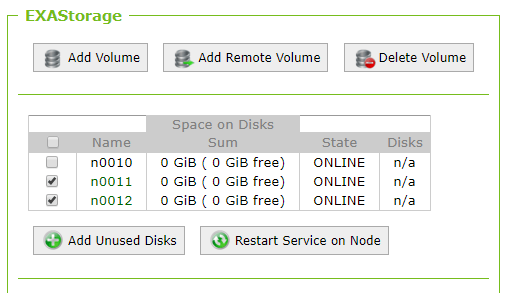
On the EXAStorage screen, click on Startup Storage Service:

Now select the two data nodes and click on Add Unused Disks:
Add a data volume
On the EXAoperation Storage screen, click on Add Volume:

Specify a Redundancy of 2, add user admin to Allowed Users, Volume Size should be 8 GB, add n11 and n12 to the Nodes List, Number of Master Nodes is 2 and Disk is d03_storage:

The new volume should then look like this:

Create a database
On the EXASolution screen, click on Add:

On the Add Database screen, specify 2 Active Nodes, assign the two data nodes and click Add

The new database shows a Status of Not created. Click on the database link:

Select the Action Create and click Submit:

The Action should change to Startup, n11 and n12 appear as Selected. Click Submit again:

The State changes to Starting for n11 and n12. Click on EXASolution on the Services menu on the left:
The new database should now show as Online.

Congratulations for going the whole way, it was a bit long at times, wasn’t it? But now you have your own Exasol cluster sandbox on Hyper-V – have fun with it!
Going forward, I find it convenient to create Hyper-V checkpoints with the database and storage service shutdown and the nodes having the cluster services shutdown as well. That way I make sure nothing can change on the disks of the data nodes when I take the checkpoint. I can then just turn off the VMs and apply these checkpoints afterwards. Then starting the VMs saves me the time they would need to go through the normal boot process otherwise. My next article will explain how to add a reserve node to this cluster, bringing it from 2+0 to 2+1. Hope you find this mini-series useful 🙂

